Routes and Navigation 🆕 ✨
Unity AR+GPS location bring a new and long awaited feature: Routes and Navigation!
This feature integrates with the Mapbox Directions API to create augmented-reality routes in real-time, allowing the application user to view directions, navigation instructions, distances, and a guiding line on the ground.
The Routes and Navigation feature is specially well suited for guiding user through
outdoor expositions, events, concerts, zoos, treasure hunts, you name it!
The base of this feature is the MapboxRoutes component. In the following
sections will get in detail on how to use this component to create
location-based AR experiences with navigation, how to create custom routes to
places not mapped by Mapbox, and how to customize everything by creating
scripts to build your unique experience.
All the content related to the Routes and Navigation feature, like scripts,
prefabs and sample scenes, can be found in the directory
Assets/ARLocation/Mapbox Routes. If you have no need to use this feature you
can safely delete this directory from your project.
Quickstart
Create a new scene in unity. Then right-click on the Hirarchy window and click on AR+GPS -> Create Basic Scene Structure.
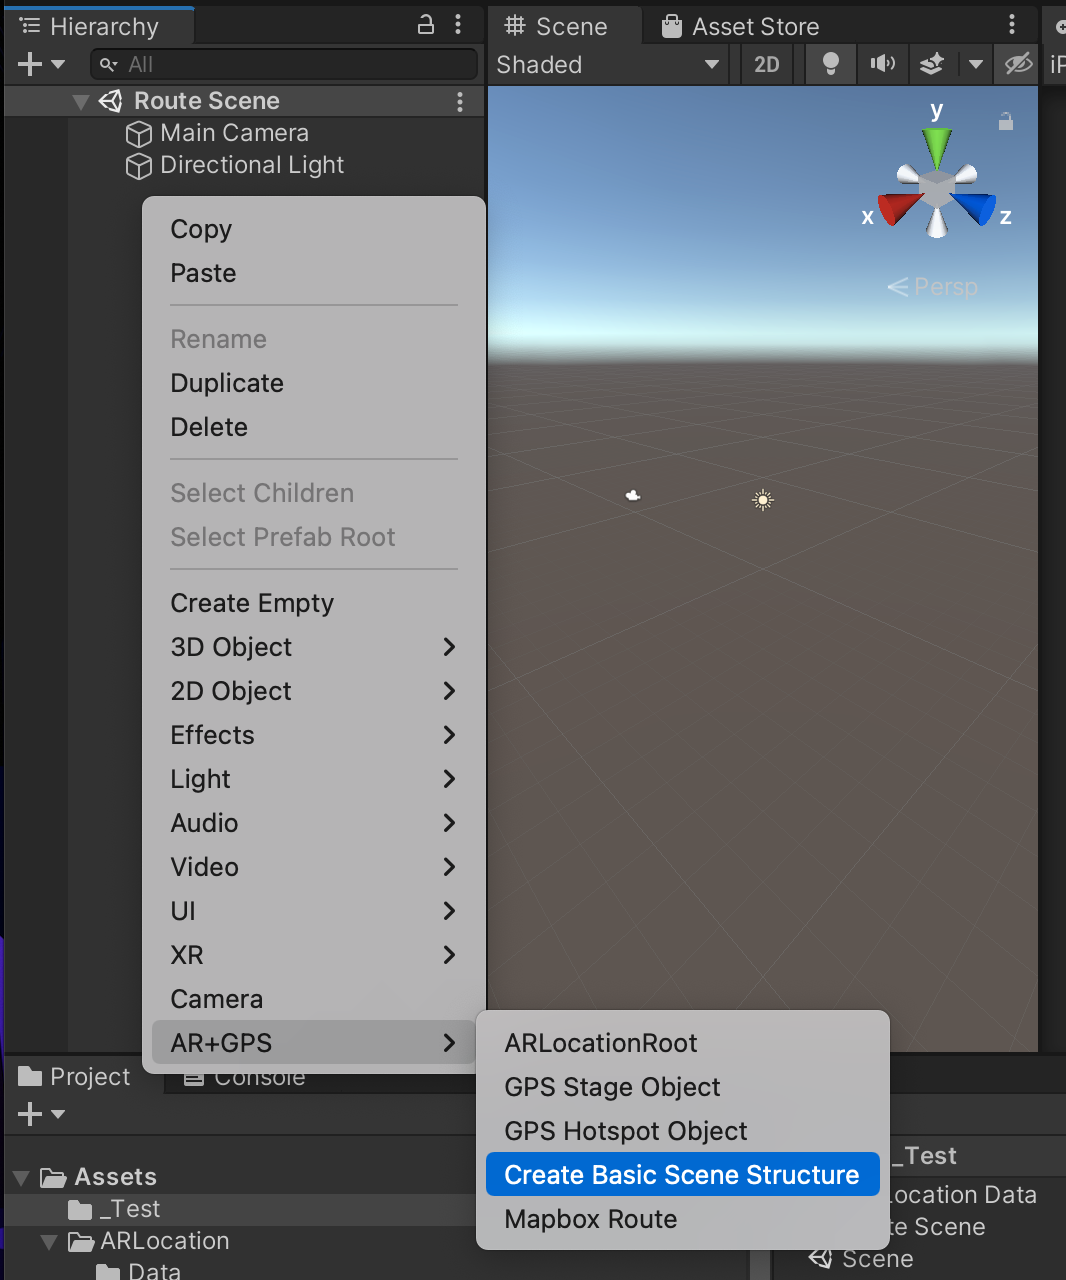
Next, on the same context menu, click on the AR+GPS -> Mapbox Route button. This will create a GameObject with the name
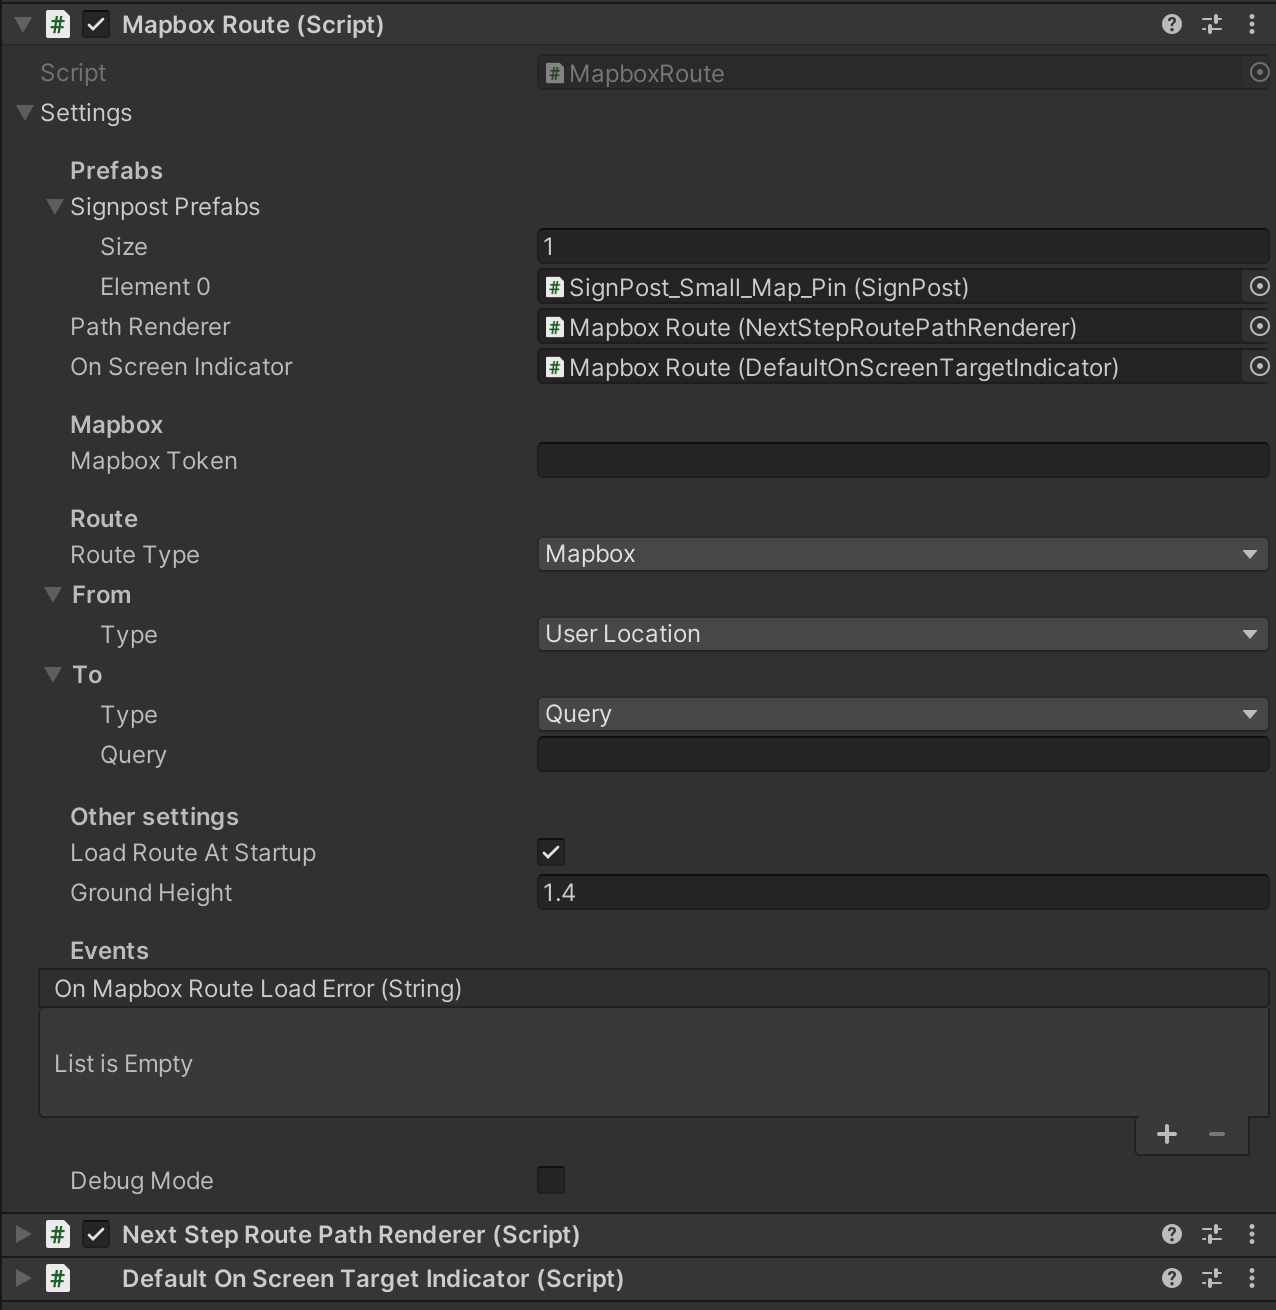
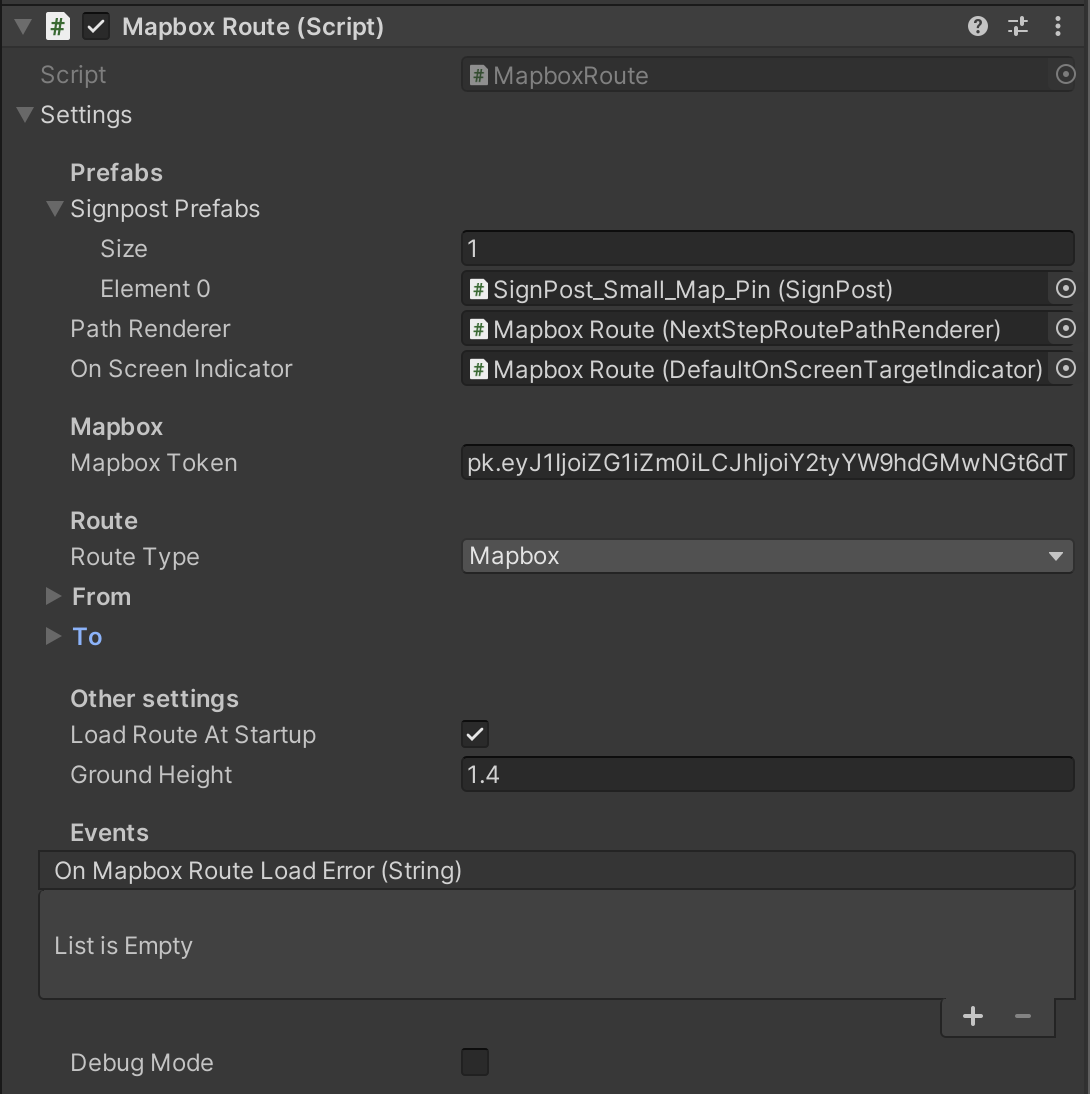
MapboxRoute on your scene, containing all the components necessary for a minimally working route experience:
Now head over to the tokens section of your mapbox account page, and either create a new token or copy an existing token
and paste it on the Mapbox Token property of the MapboxRoute component in the inspector:
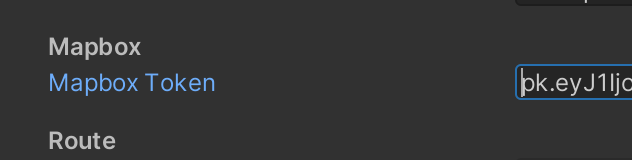
This step is essential since the we can't access the mapbox API without this token.
The next step if configuring our route. For a simple example we can just use a hard-coded one, but you can configure the route at runtime for a dynamic experience.
A route is defined by two Waypoints, which are called From and To in
the inspector. They define where the route start and where the route ends.
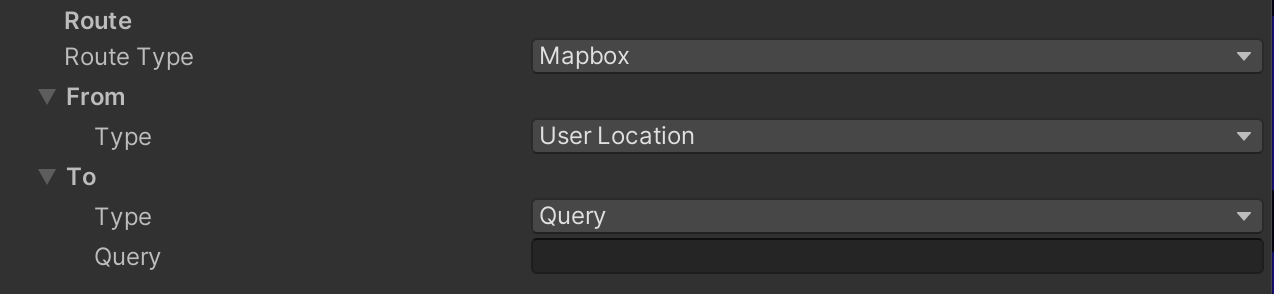
Each Waypoint can be of three different types:
- User Location means that the waypoint will be at the user location;
- Location means the
Waypointwill be defined by geo-coordinates (i.e., latitude and longitude) - Query means that the location will be the first result of a Mapbox Query.
A Mapbox Query is a string that represents a location, like its address,
e.g.,
"160 E 25th St, New York, NY 10010".

For our basic example the default setting will do. It will create a route
starting at the user's location, and ending at the address defined by Query.
So go ahead and write the address of a place near you as the query! You can use this mapbox playground to test the query before using it here.

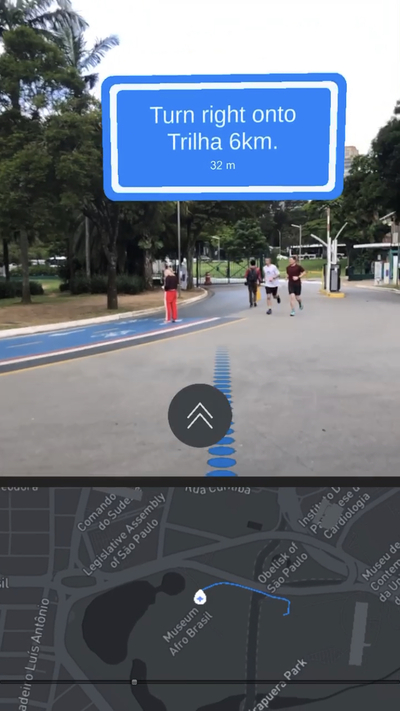
And... That's about it! Build your project, deploy it do your device and test it out! You should see something like this:
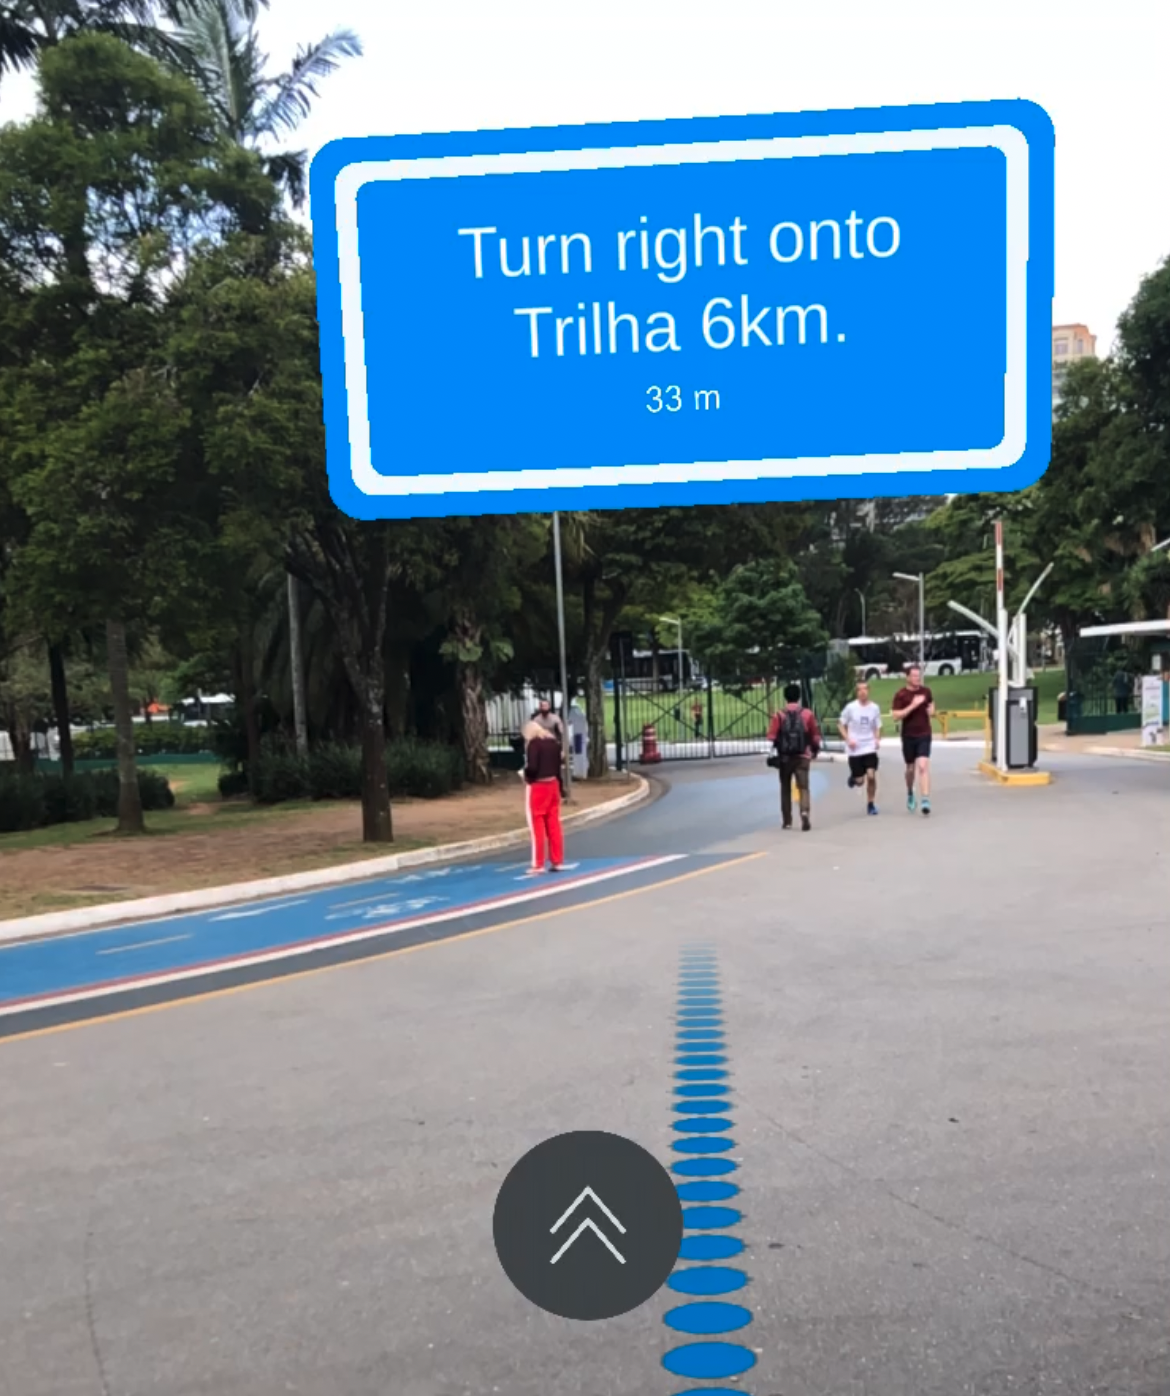
Route anatomy
A Route is a sequence of line segments which the user must walk through to arrive at his destination Waypont beginning from his starting Waypoint.
Each segment is called a route Step, and it's defined by two geo-coordinates along with a instruction the user must perform while moving along this route step as well some additional data.
The actual route between each Step does not have to be a straight line/segment, but can gave its own complex geometry.
Custom routes
You are not limited to routes provided by the mapbox Directions API. You can also create Custom Routes using your own data. For instance if you are trying to crate routes for an area or venue which does not have routes in mapbox you will want to use this feature.
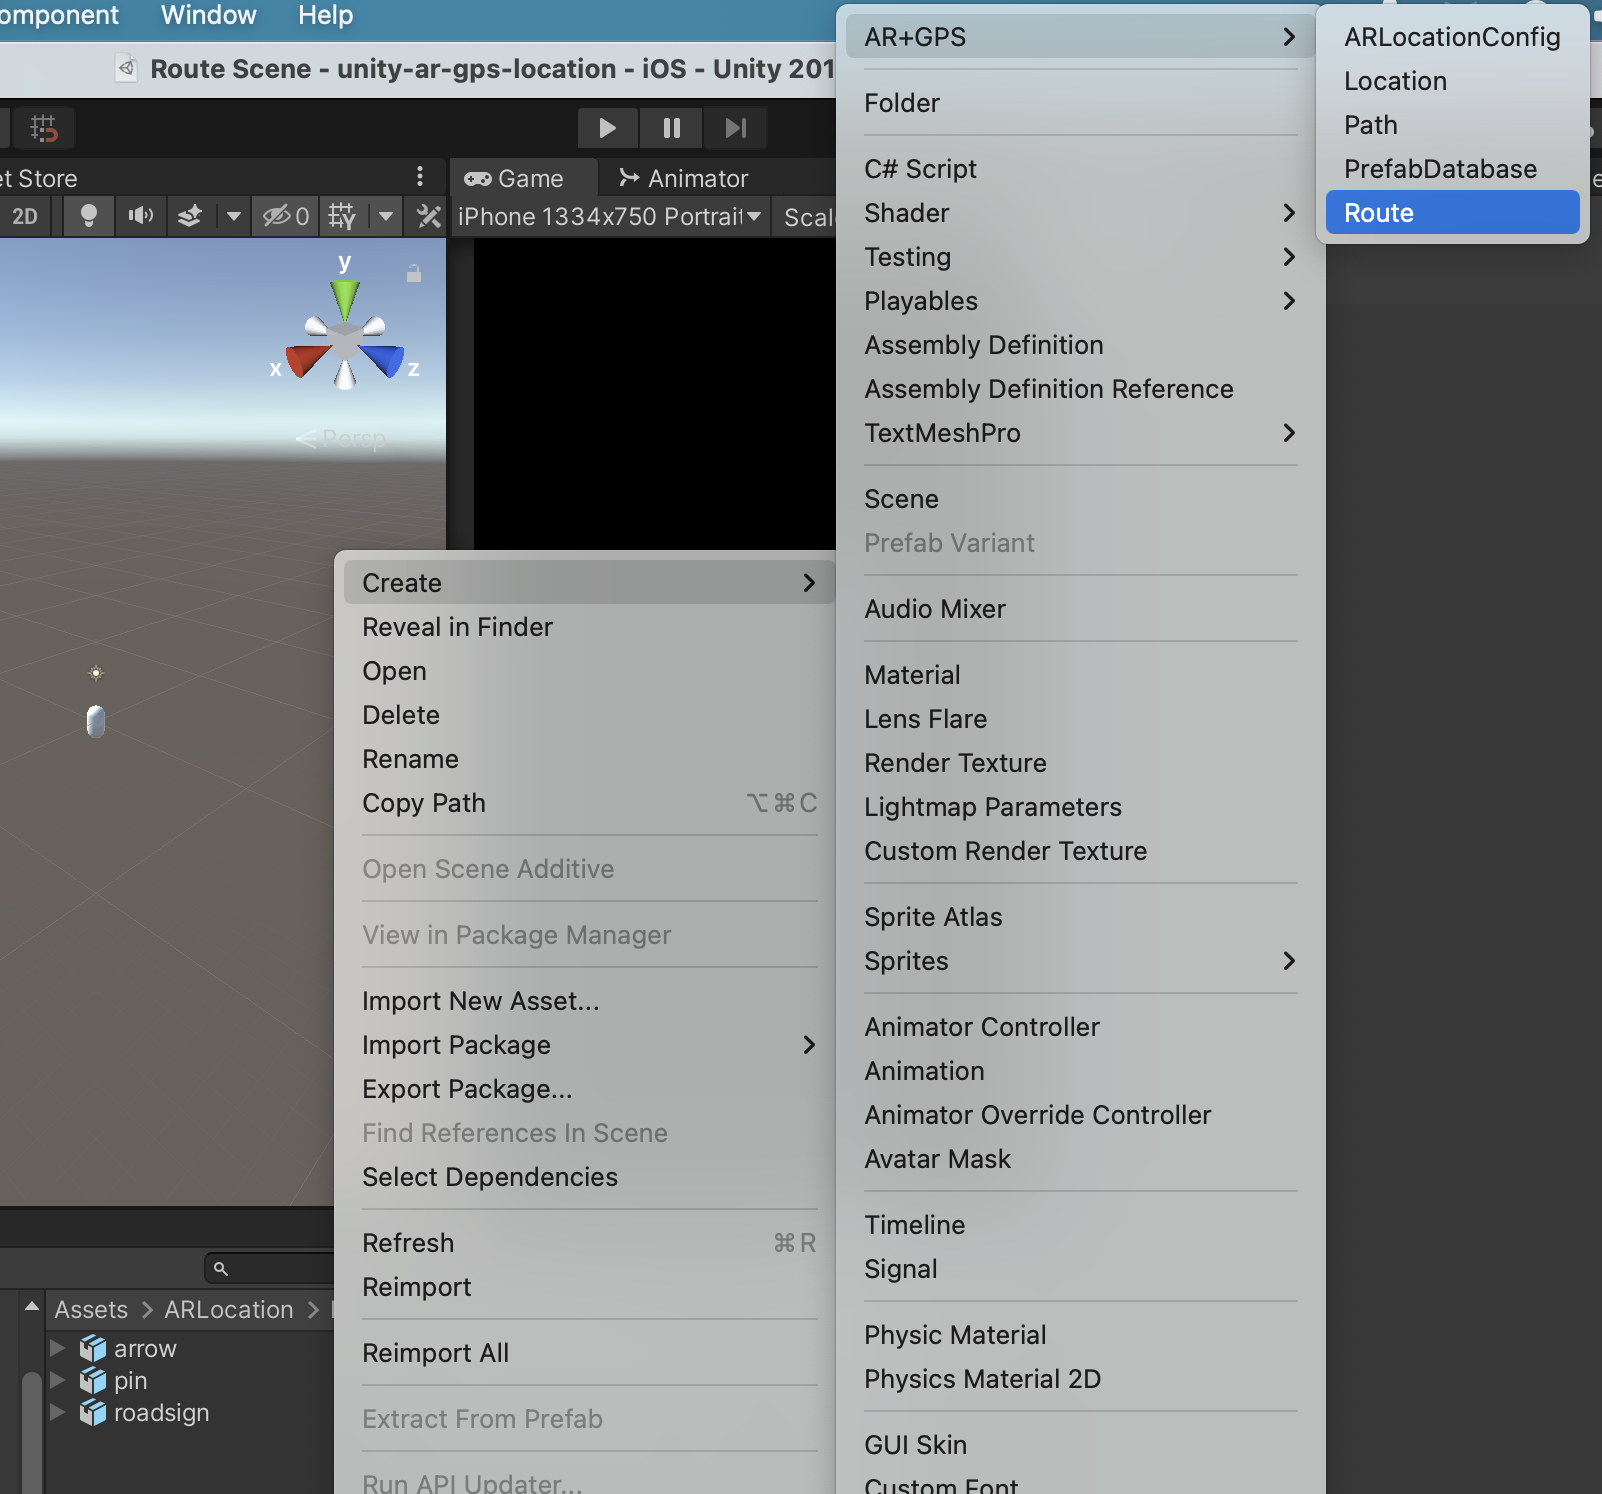
To create a custom route, right click on the Projects folder, and in the context menu click
on Create->AR+GPS->Route.
- A custom route consists of a sequence of two or more Points.
- The first and last points of the custom route are the route's Waypoints.
- Any point of the route can be marked as a Step by checking the
Is Stepoption. - Here is an example of a simple custom route:
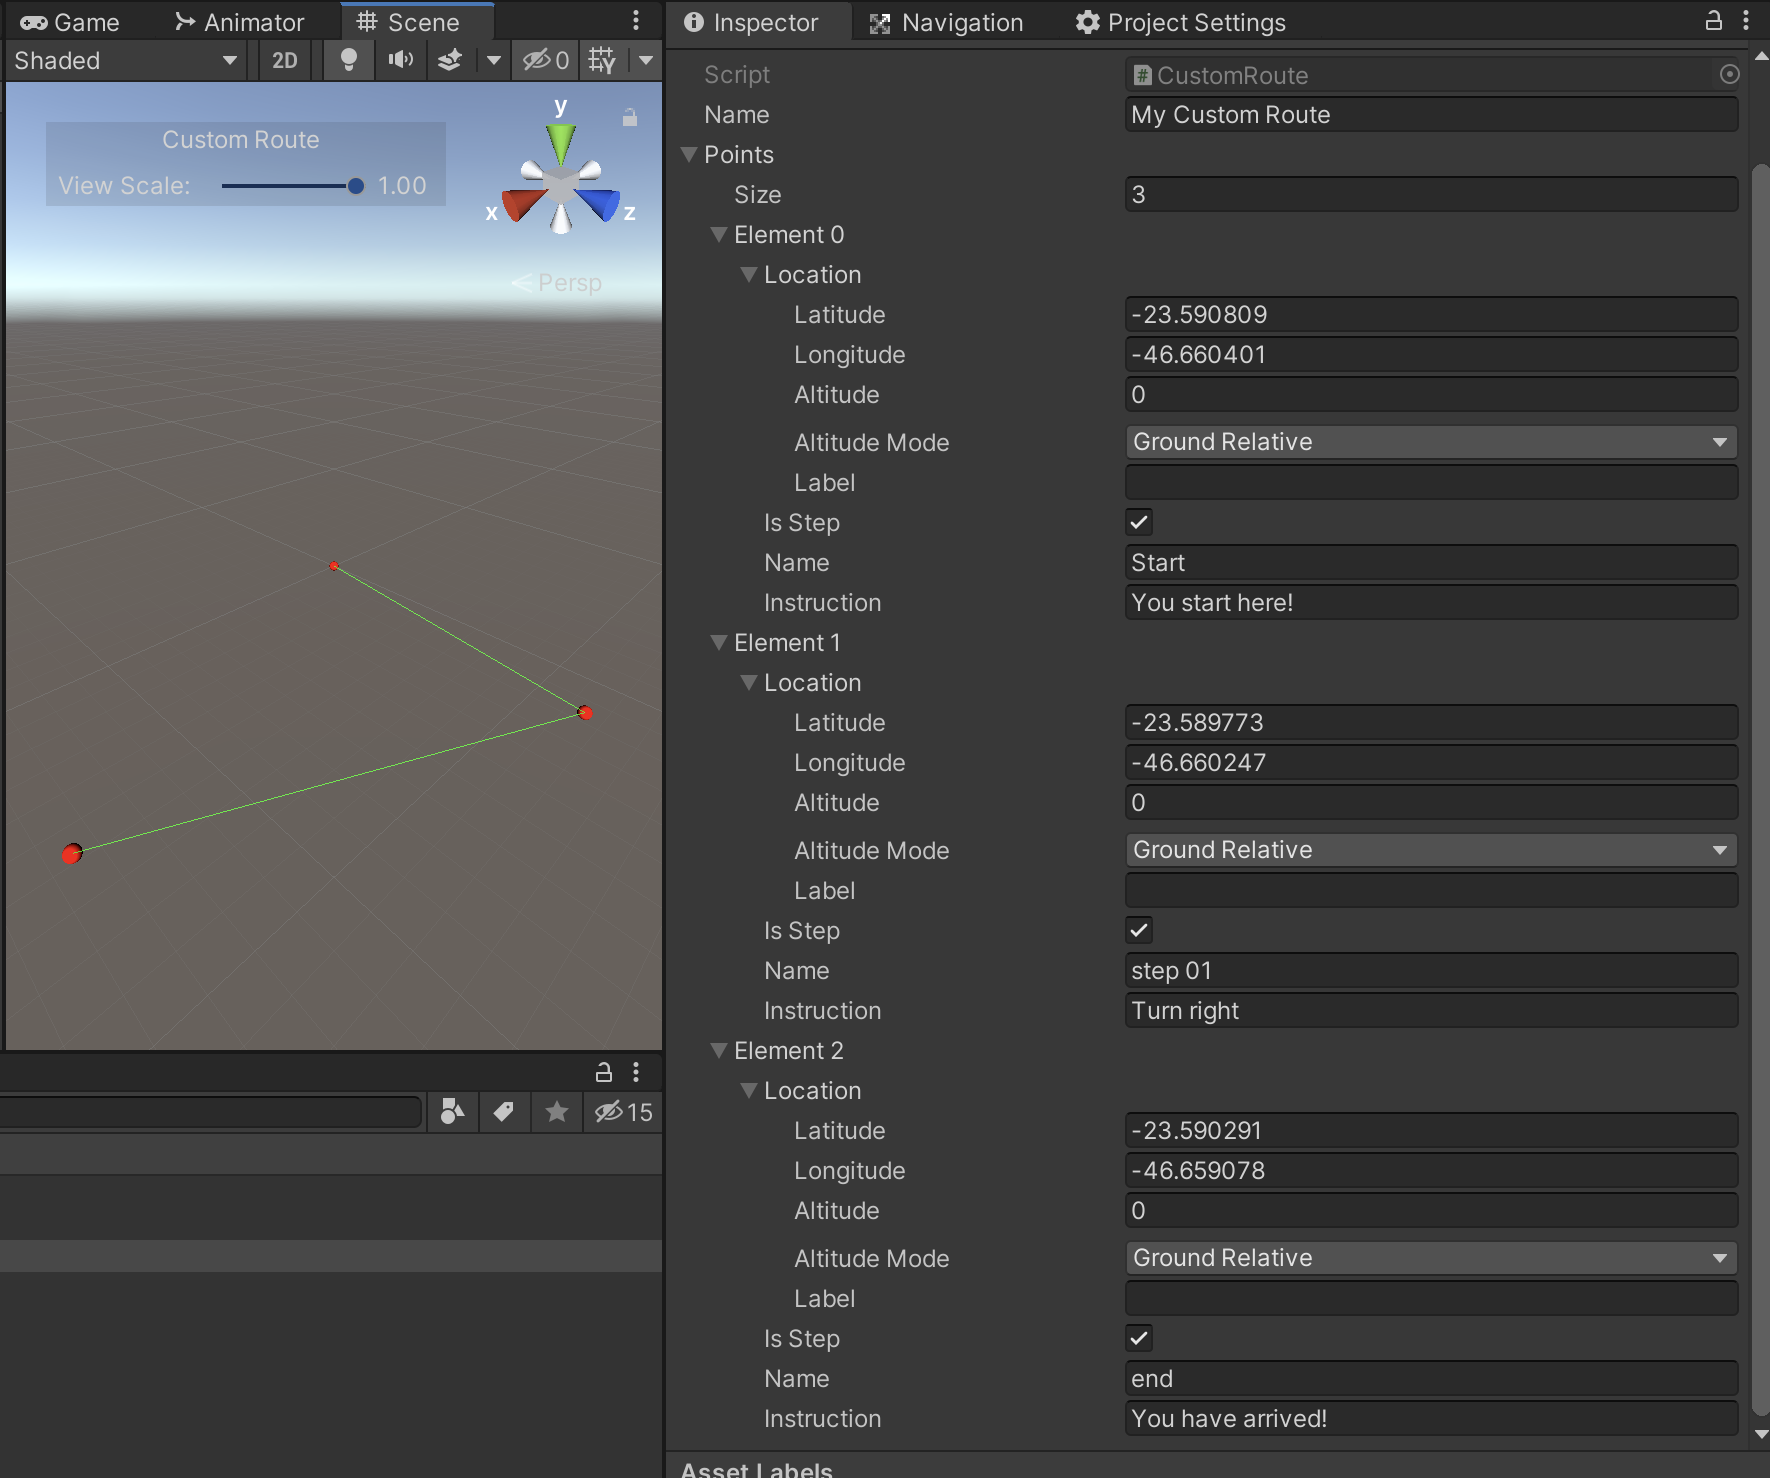
- Each point of the route has a:
- Location which configures the geo-location of the step
- Name is an optional name of the step
- Instruction is a description of the action the user will take at this step. This is the string that will appear at the SignPost.
Import kml files
You can import kml created in an application such as Google earth to create custom routes easily.
Lets go through a step by step guide on how to do it.
First open the Google earth app and create new project.
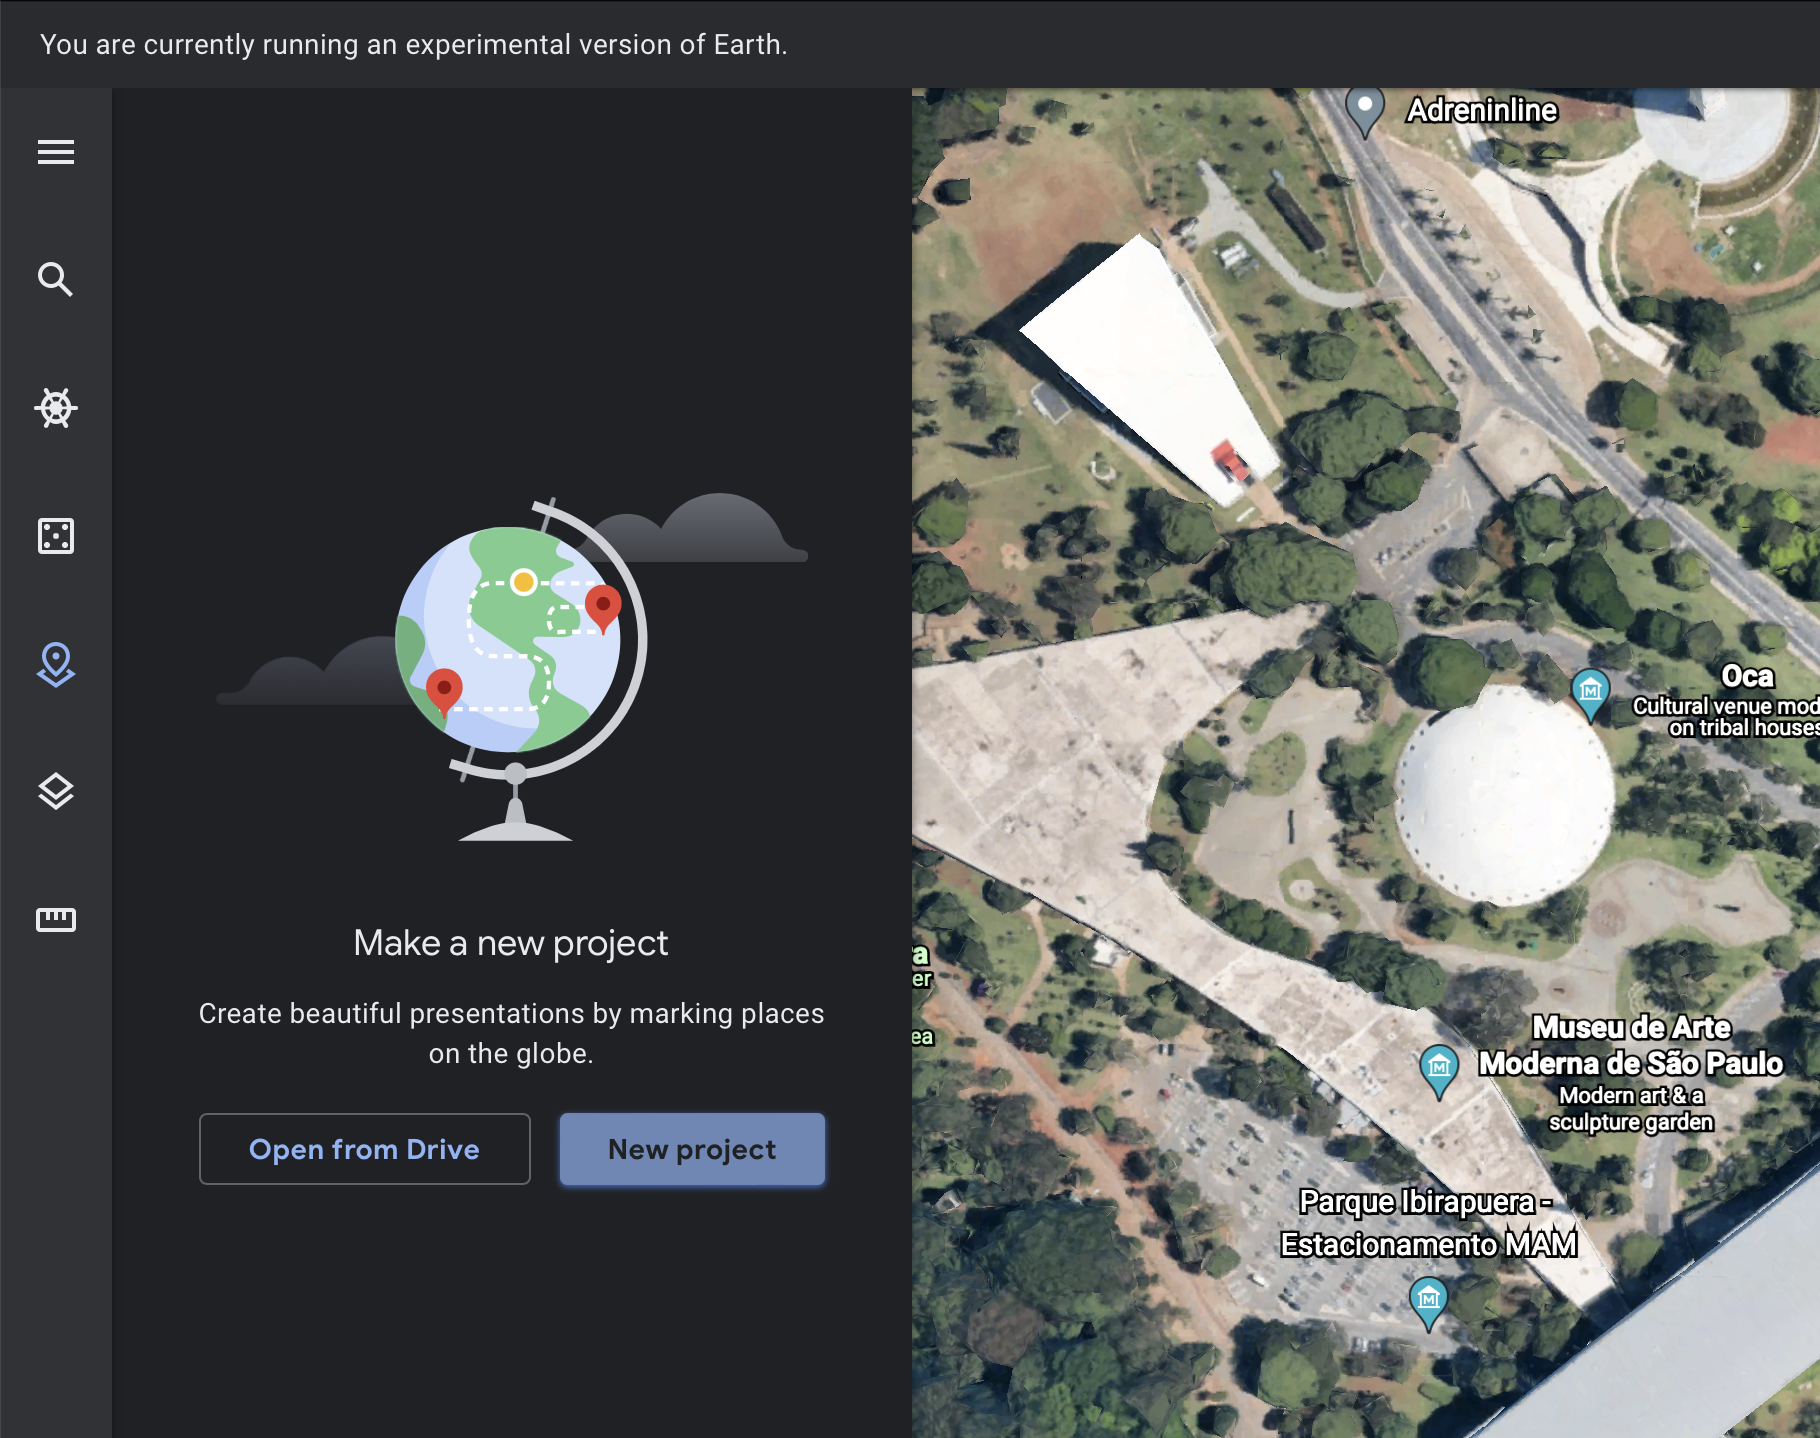
Next click on New Feature and then on Draw line or shape.
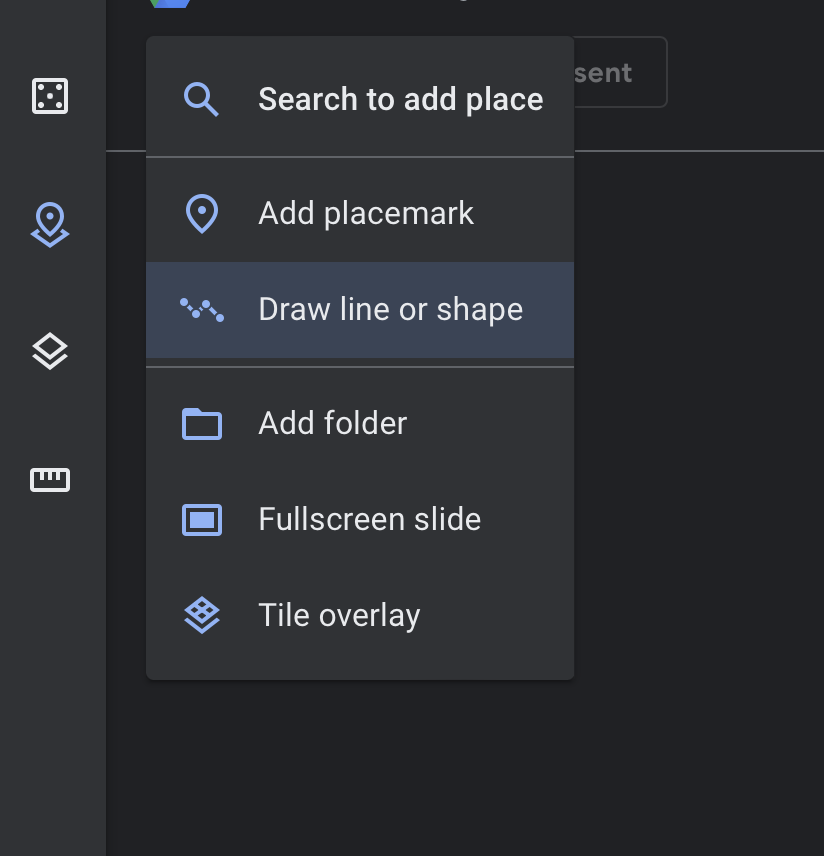
You can then draw your route by adding points to the line. Remember that not all points need to be Steps with maneuvers; some can be just for geometry.
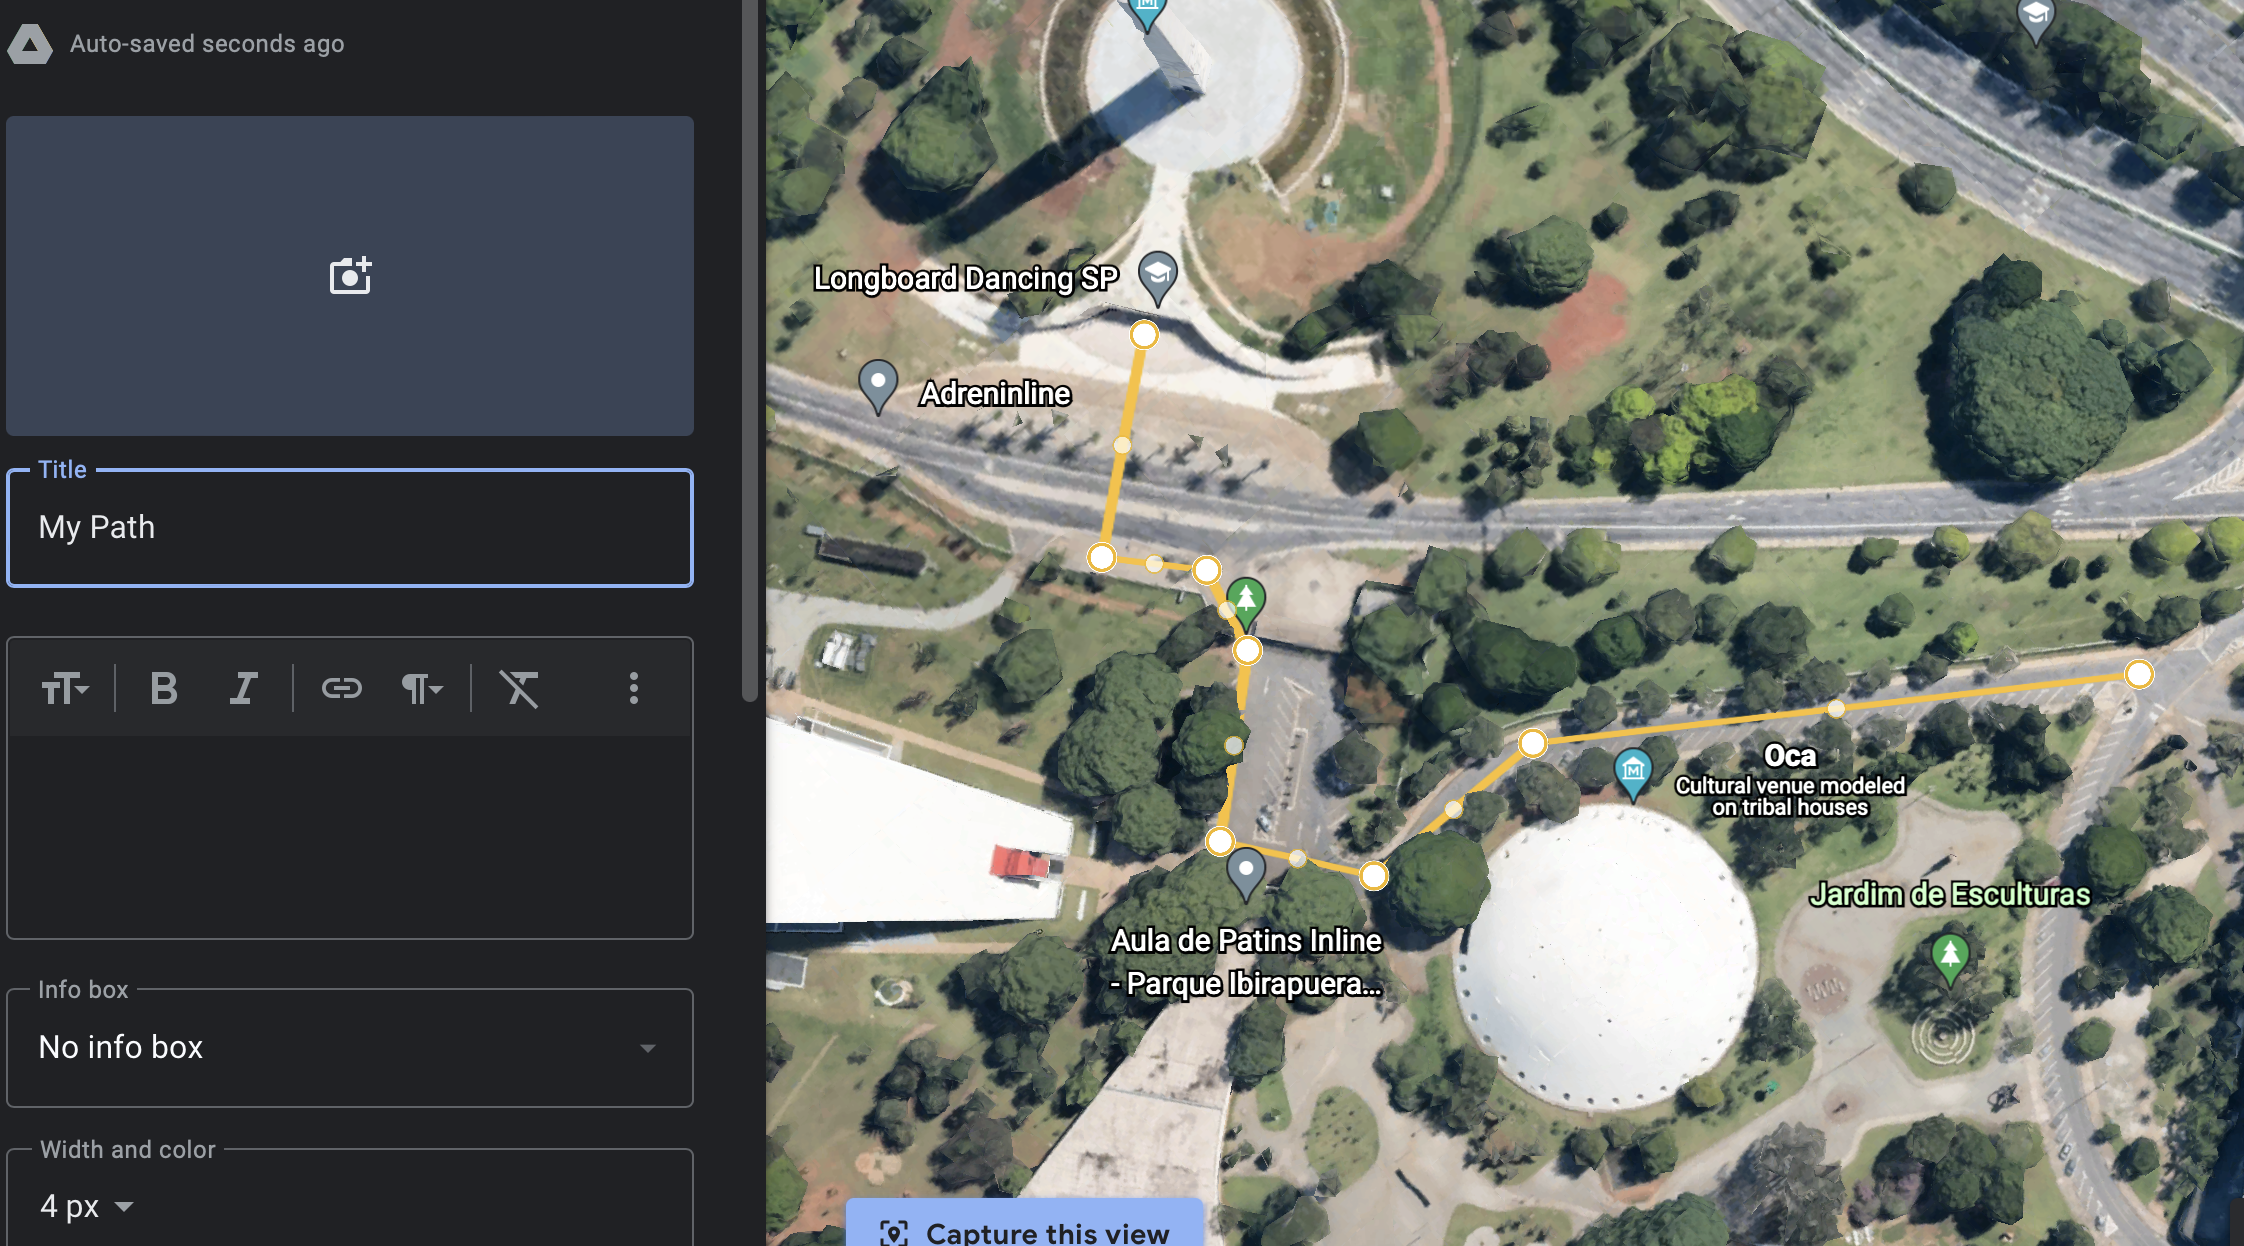
After your route's path is drawn, you can export your KML file and download it to your computer.

Now import the kml file into your Unity project, e.g., by dragging the file to the Project tab. Then
right-click on the imported .kml file and click on AR+GPS -> Custom Route From KML.
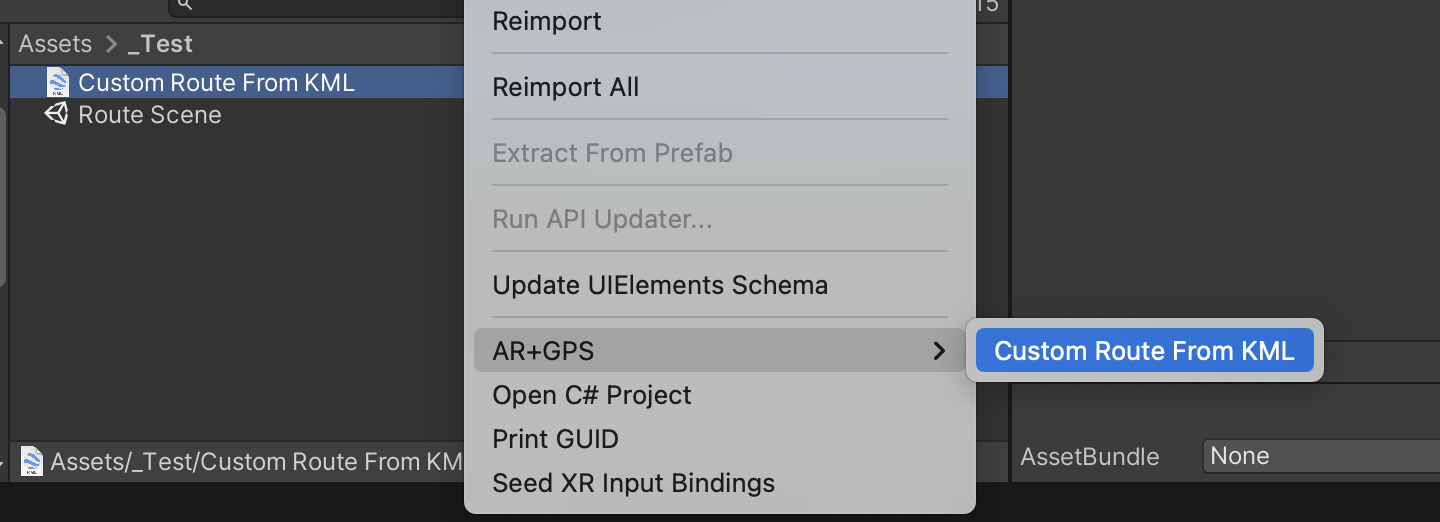
A new Custom Route asset will be created with the data imported from the KML file.
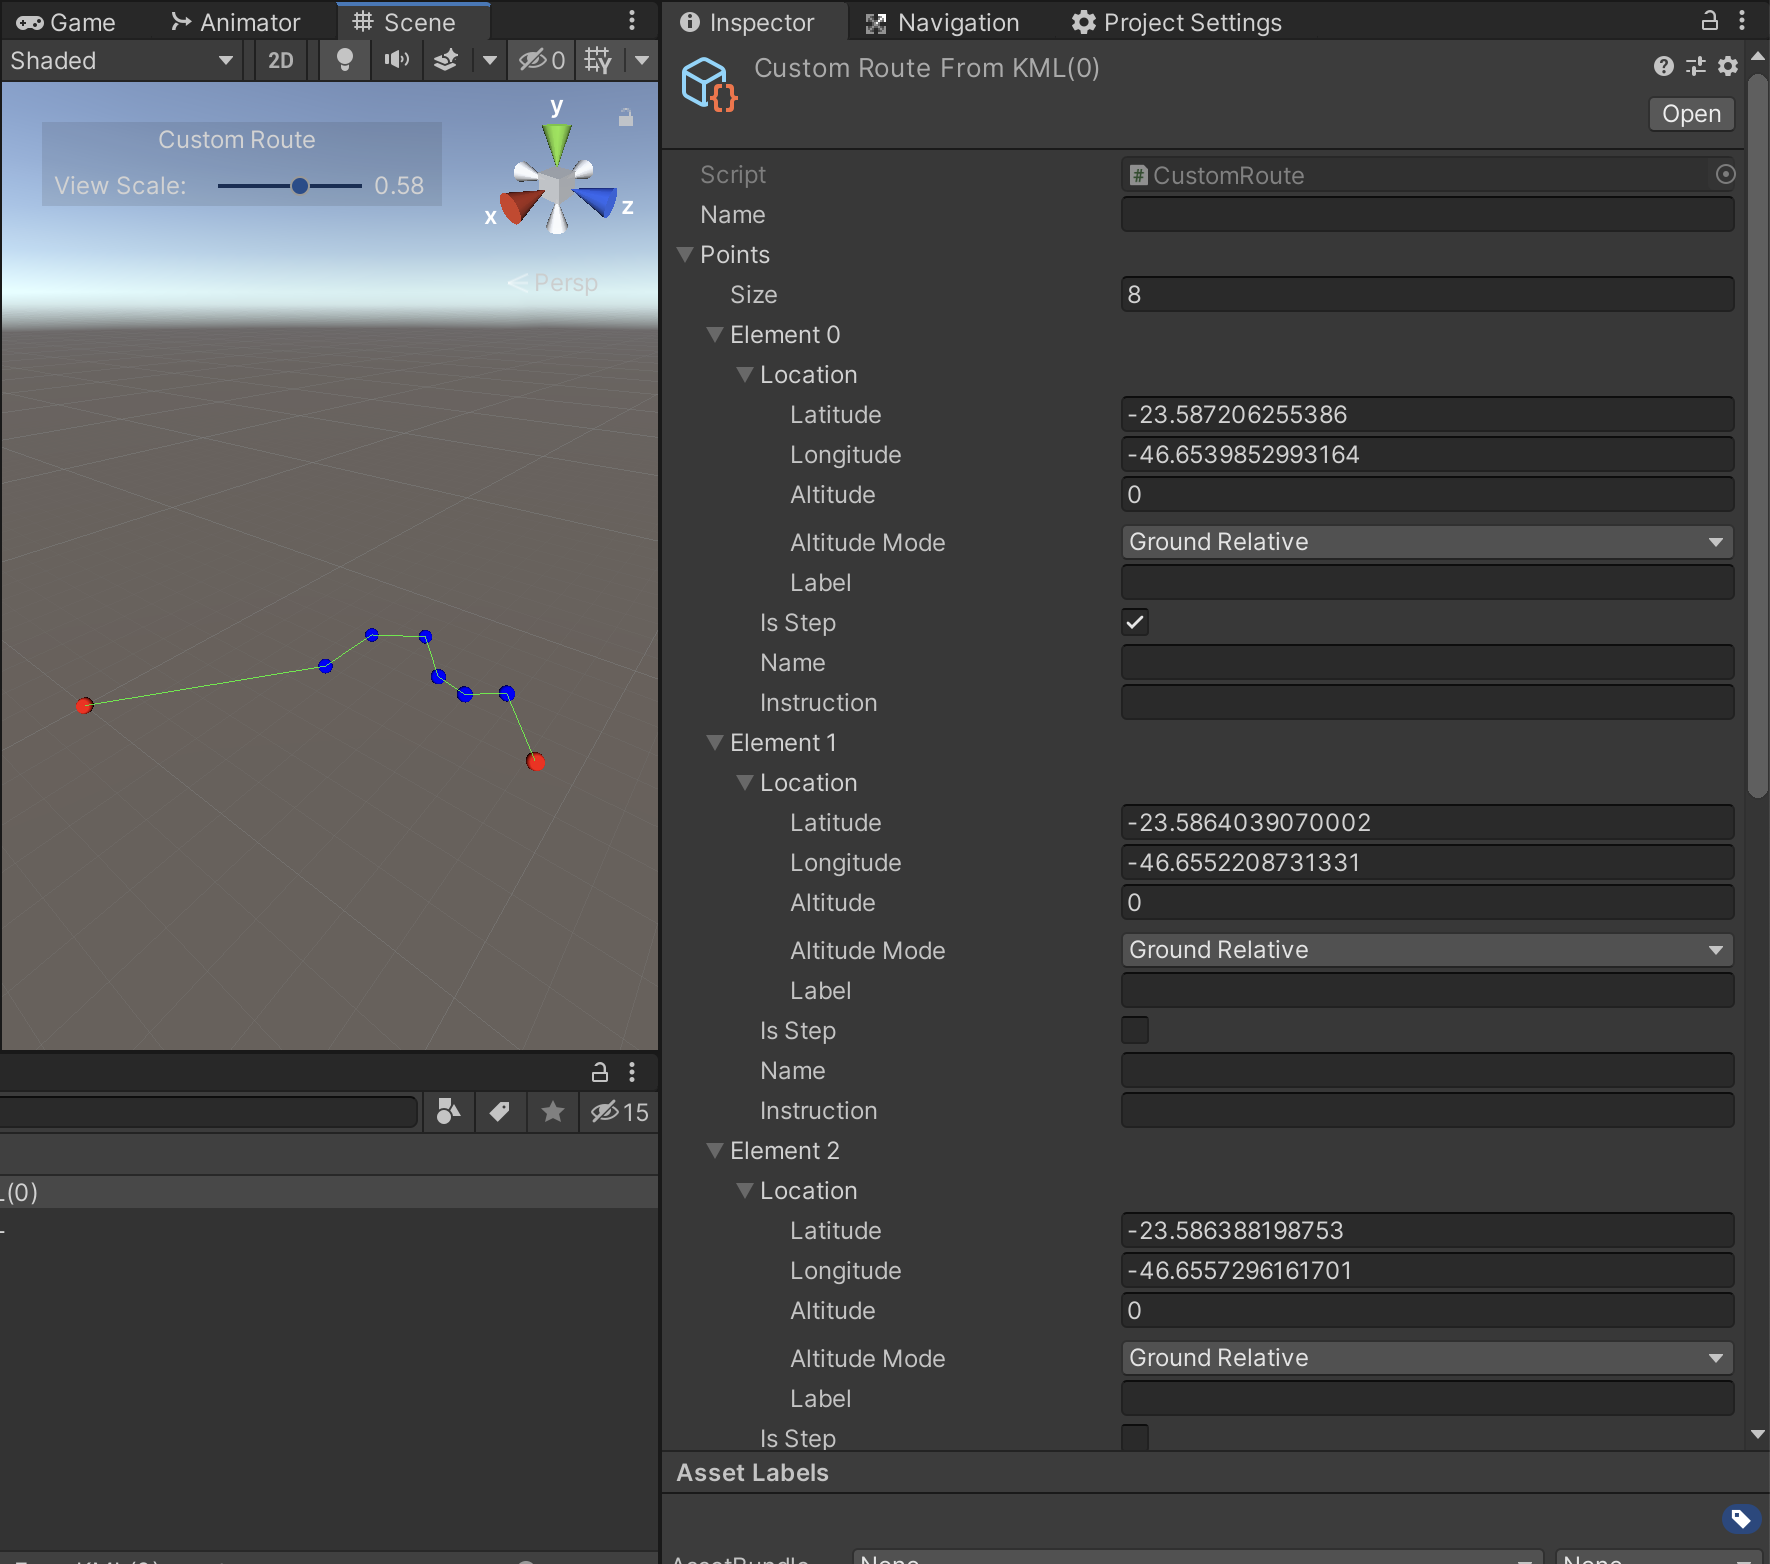
Now you'll need to pick which points from the route will be Step points, and add navigation instructions to these points.
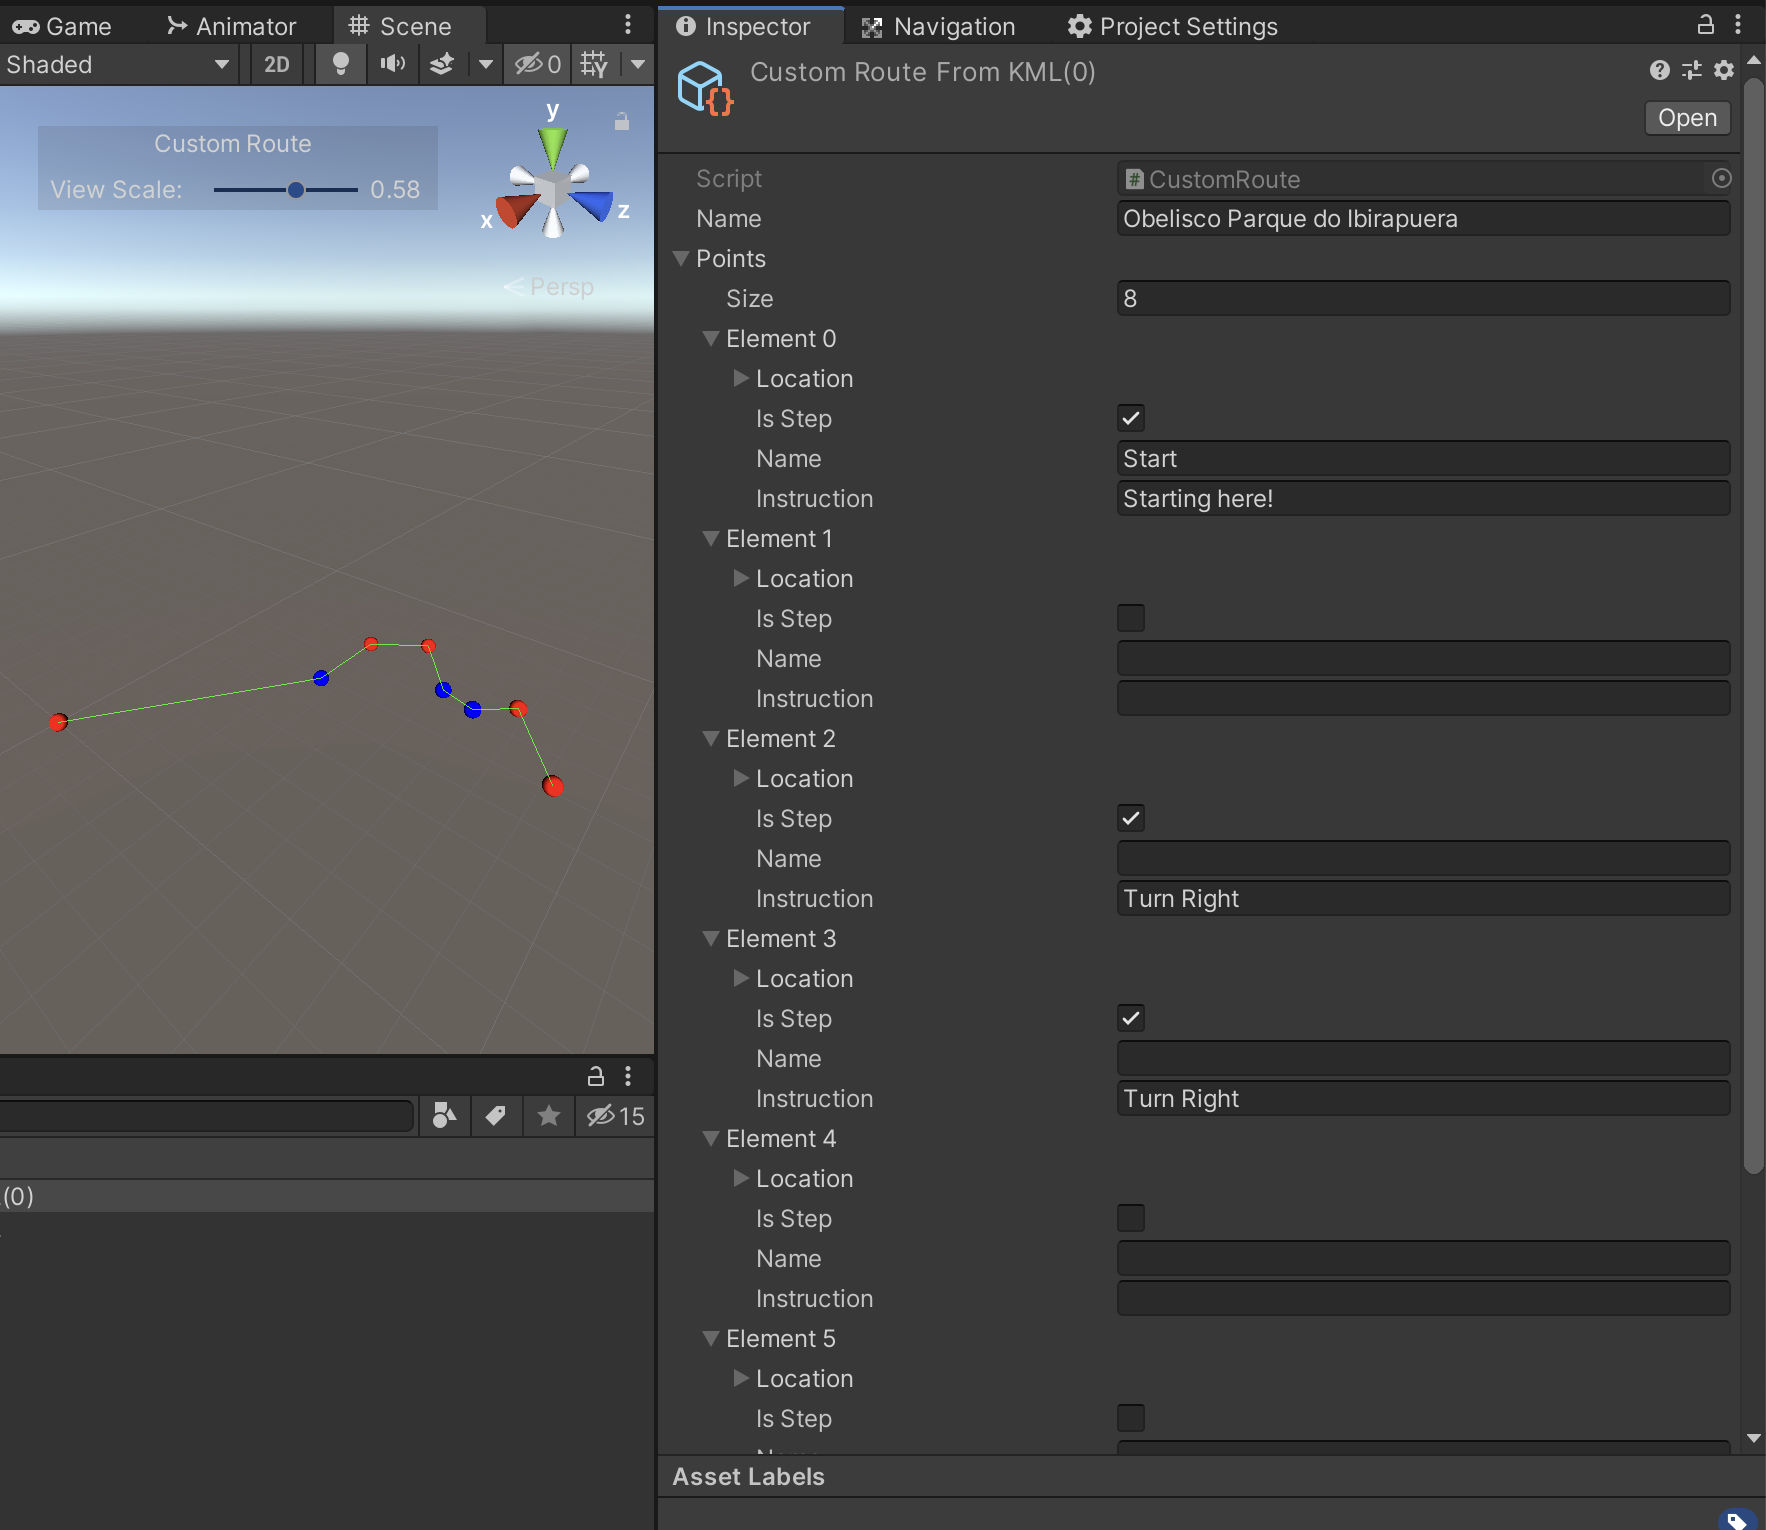
And now your Custom Route is ready to be used in your application!
Sample project
Sample project using mapbox unity to display a 2D map, similar to the google maps live view experience.
Sample Project with Map View (Download)
Abstract Monobehaviour Classes
Abstract Route Renderer
This abstract class derived from Monobehaviour is used to implement the rendering of the line indicating the route's
path to the user.
Methods
public abstract void Init(RoutePathRendererArgs args): Called by theMapboxRoutecomponent when the route is being initialized.public abstract void OnRouteUpdate(RoutePathRendererArgs args): Called by theMapboxRoutecomponent on itsUpdateMonobehaviour method.
Built-in implementations
Abstract On Screen Indicator
This abstract class derived from Monobehaviour is used to implement the on-screen indicator arrow that indicates to the user the direction
where the next target is located when it is out of screen view.
Methods
public abstract void Init(MapboxRoute route): Called by theMapboxRoutecomponent when the route is being initialized.public abstract void OnRouteUpdate(SignPostEventArgs args): Called by theMapboxRoutecomponent on itsUpdateMonobehaviour method.
Built-in implementations
Abstract Route Signpost
This abstract class derived from Monobehaviour is used to create components that are attached to each of the route's Steps to
help guiding the user in various ways.
Each instance of this abstract class will be attached to a specific Step of the route.
Methods
public abstract void Init(MapboxRoute route): Called by theMapboxRoutecomponent when the route is being initialized.public abstract bool UpdateSignPost(SignPostEventArgs args): Called by theMapboxRoutecomponent on itsUpdateMonobehaviour method.public abstract void OnCurrentTarget(SignPostEventArgs args): Called when the step to which theAbstractRouteSignpostis attached to becomes the current target.public abstract void OffCurrentTarget(SignPostEventArgs args): Called when the step to which theAbstractRouteSignpostis attached no longer is the current target.
Built-in implementations
Waypoint
A Waypoint is a data structure that indicates and start or ending point of a Route. A Waypoint can be one of three types: User Location, Location, or Query.

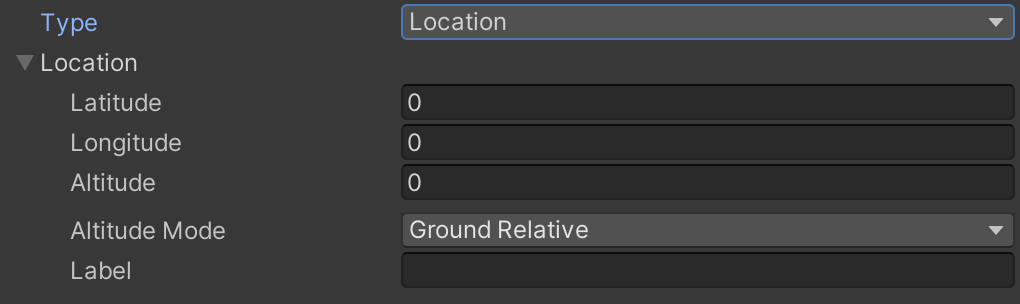

- User Location: In this case the Waypoint resolves to the current user location. Usually used for the starting point of the route.
- Location: Resolves to a geo-location defined by latitude/longitude coordinates.
- Query: Resolves to the first result of the mapbox Search API for the given query string.
Component Reference
Mapbox Route
Properties:
- Sign Post Prefabs: An array components which derive from
AbstractRouteSignpost. These should be Prefabs,
since they will be instantiated at every Step of the route. They should
be used to implement things which are associated with route Steps, like
the sign post indicating to the user the next Step's instruction and
distance. It is optional and can have
0elements. - Path Renderer: A component which derives from
AbstractRouteRenderer. This should handle the
line rendering of the route's path which guides the user. It is optional and
can be set to
None. - On Screen Indicator: A component which derives from
AbstractOnScreenIndicator. Used to
implement an indicator on the screen that shows to the user the direction to
the next Step. It is optional and can be set to
None. - Mapbox Token: The Mapbox API access token used to retrieve route information from the mapbox Directions API.
- Route Type: Can be
MapboxorCustom Route. When set toMapboxit will construct a route from waypointFromto waypointTousing the mapbox Directions API. When set toCustom Routeit will construct a route from aCustom Routeasset instead. - From: The Waypoint which defines the starting point of the
route. Usually will be set to
User Location. - To: The Waypoint which defined the ending point of the route.
- Load Route At Startup: If set to
true, the route will be loaded on the component's start up. Iffalseyou will need to load the route manually at a later time by calling on of theLoadRoutemethods of theMapboxRoutecomponent. - Ground Height: The initial estimate of the ground's height relative to the device.
- On Mapbox Route Load Error: A callback that will be called if an error happens when loading the route.
Next Step Route Path Renderer
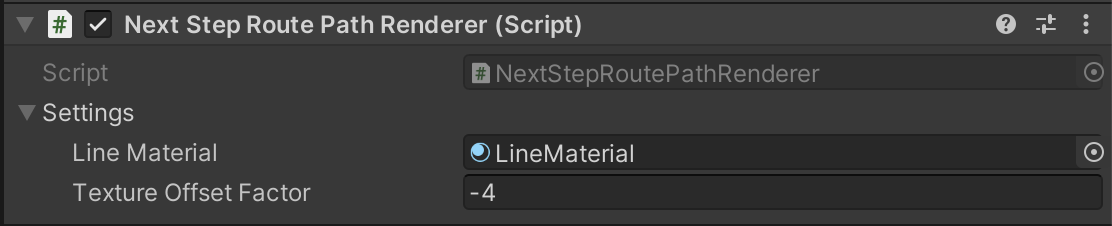
This component, which is derived from AbstractRouteRenderer, renders a line
from the current current user position to the next Step as a line on the
ground to the user, disregarding geometry due to points which are not Step
points.
It does not draw the exact route geometry, but it is useful since it is always visible to the user and shows to him how to get to the next step in a straight line.
Properties:
- Line Material: The material used to render the line.
- Texture Offset Factor: The amount of UV texture offset per distance unity applied to the texture to give the illusion that the pattern of the line is moving when the user walks along the line.
Path Route Renderer

This component, which is derived from AbstractRouteRenderer, renders the
route's path to the user as a line on the ground. It renders the route's path
geometry exactly.
Properties:
- Line Material: The material used to render the line.
Default On Screen Indicator
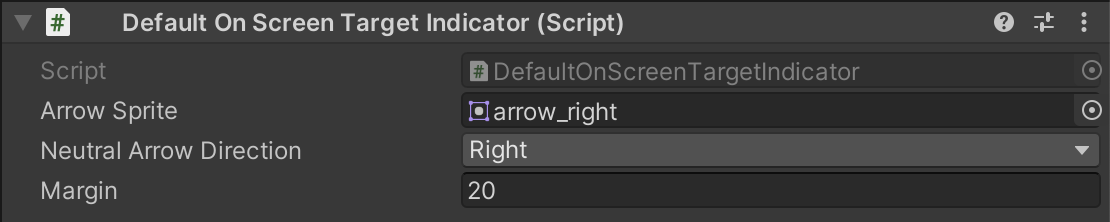 Properties:
- Arrow Sprite: The sprite representing the arrow.
- Neutral Arrow Direction: Can be
LeftorRight; this should be the direction that the arrow is pointing to in the sprite. - Margin: The margin, in pixels, from the border, used when positioning the arrow sprite.
SignPost
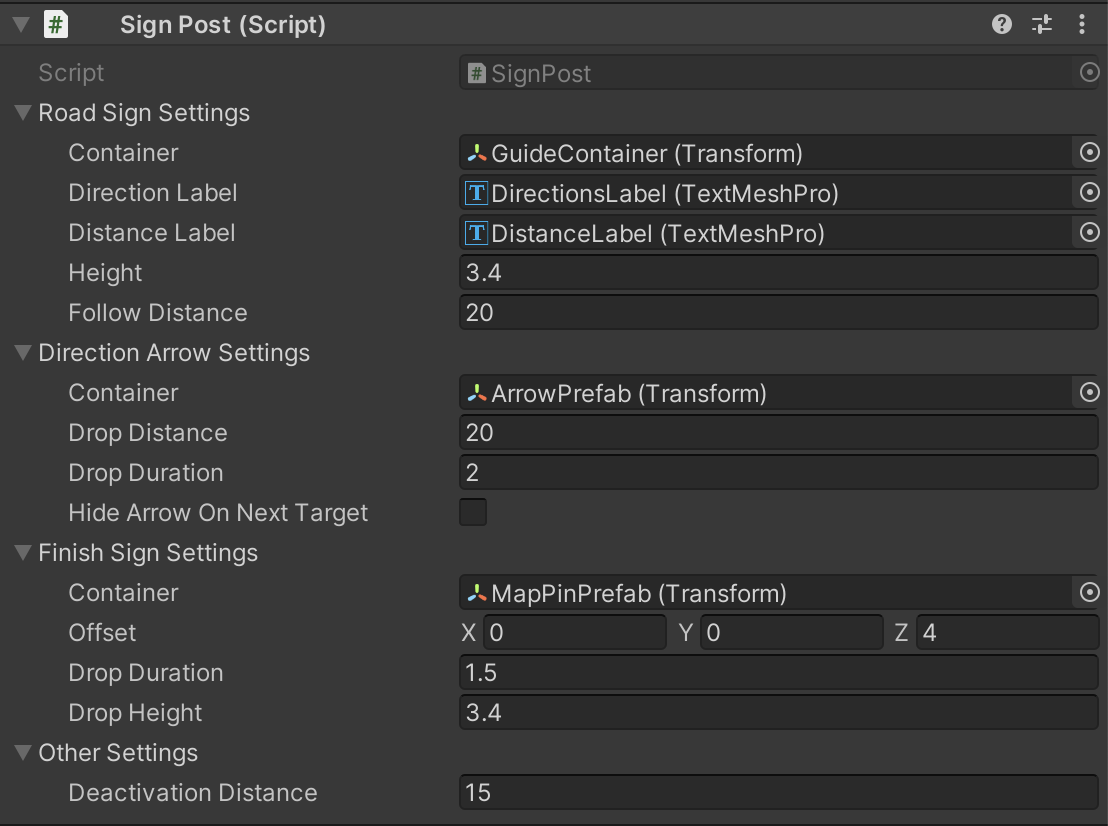
This is our default implementation of the AbstractRouteSignpost
Monobehaviour. It consists of three components:
- A Direction Sign which follows the user, showing the string of the next step's maneuver as well as the distance to the current step.
- A 3D Arrow Mesh which shows the direction the user must go to the next Step.
- A 3D Finish Sign which will be displayed once the user reaches the final Waypoint.
Properties:
- Road Sign Settings
- Container: The container
GameObjectin which the Road Sign mesh is contained. - Direction Label: A
TMP_Textwhich will display the Step's instruction. - Distance Label: A
TMP_Textwhich will display the distance to the next Step. - Follow Distance: The distance at which the Sign Post mesh will follow the user.
- Container: The container
- Direction Arrow Settings
- Container: The container
GameObjectin which the Arrow mesh is contained. - Drop Distance: The distance at which the arrow becomes activated.
- Drop Duration: The duration of the arrow's drop animation.
- Hide Arrow On Next Target: If true, the arrow will be hidden as soon as the next target is activated.
- Container: The container
- Finish Sign Settings
- Container: The container
GameObjectin which the finish sign mesh is contained. - Offset: The position offset of the finish sign mesh, relative to the Step position.
- Drop Duration: The duration of the drop animation.
- Drop Height: The height from which the mesh is dropped in the animation.
- Container: The container
- Other Settings
- Deactivation Distance: The distance where, after it is activated, the sign post becomes inactive/hidden.